QUIC 协议汲取了大量人们给 TCP 糊墙的经验教训,把连接结构优化到(目前来看)极致。但是现在市面上的代理工具还没有能完全利用 QUIC 特性的存在,所以别人动手写了一个基于 QUIC 协议的新代理工具:TUIC
https://github.com/EAimTY/tuic
- 1-RTT TCP 中继
- 0-RTT UDP 中继,且 NAT 类型为 FullCone
- 在用户空间的拥塞控制,也就是说可以在任何系统平台实现双向的 BBR
- 两种 UDP 中继模式: native (原生 UDP 特性,数据仍被 TLS 加密)和 quic (100% 送达率,每个包单独单独作为一个 QUIC “流”,一个包的确认重传不会阻塞其它包)
- 完全多路复用,服务器和客户端之间始终只需要一条 QUIC 连接,所有任务作为这个连接中的 “流” 进行传输(一个流的暂时阻塞不会影响其它流),所以除连接第一个中继任务外的其它任务都不需要经过 QUIC 握手和 TUIC 的鉴权
- 网络切换时的会话平滑转移,例如在从 Wi-Fi 切换到移动数据时连接不会像 TCP 一样直接断开
- 0-RTT 、与中继任务并行的鉴权
- 支持 QUIC 的 0-RTT 握手(开启之后能达到 真・ 1 -RTT TCP 和 0-RTT UDP ,但是就算不开启,多路复用的特性也能保证在绝大多数情况下 1-RTT 和 0-RTT )
TUIC 的设计介绍在仓库中 Design 一节有说明。TUIC 协议的详细内容在 这里。简单来说,TUIC 的设计核心就是减少握手造成的网络往返时延( rtt ),毕竟对于网络程序这是最大的瓶颈。
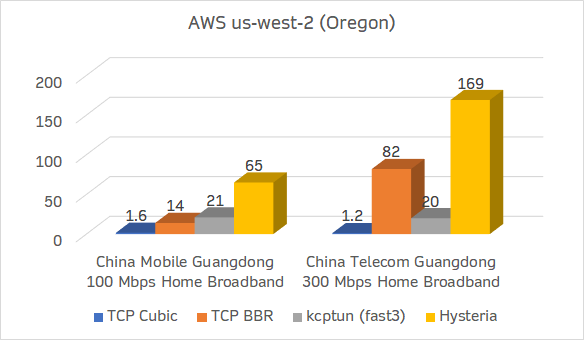
对比其它使用 TCP 的代理工具( ss 、v2ray 、trojan ),TCP 握手慢,且不支持自定义拥塞控制,各工具对 UDP 的支持也各有问题。对比 Hysteria ,Hysteria 的 UDP 中继需要 1 rtt 的握手,且只支持一种 UDP 模式。
最后说说安全性和协议特征。TUIC 现在基于原生 QUIC ,不支持 obfs ,但 QUIC 连接本身就是 TLS 加密的,每个 QUIC 连接从外面看都是一样的。国内的各大厂也慢慢开始使用 QUIC 了,所以我觉得 QUIC 特征应该不是什么大问题。
手动搭建:
-你需要有一定的 Linux 基础
-你需要有一台服务器,并且会使用 SSH 连接服务器
-你需要有一个域名
因为我的小鸡是 Ubuntu/Debian,所以下面的教程全部基于 Ubuntu。
安装服务端:选择地址:https://github.com/EAimTY/tuic/releases
系统 glibc 版本够高就用 gnu,不够高就用 musl
!!!!!!不要尝试升级glibc!!!!!!
apt -y update
apt -y install wget certbot
mkdir /opt/tuic && cd /opt/tuic
wget https://github.com/EAimTY/tuic/releases/download/1.0.0/tuic-server-1.0.0-x86_64-linux-gnu
chmod +x tuic-server-1.0.0-x86_64-linux-gnu
新建tuic配置文件:
cd /opt/tuic && nano config.json #其实可以使用winscp工具去编辑文件
粘贴下边内容到文件:
{

{
"server": "[::]:55555",#你想要的端口,
"users": {
"8e21e704-9ac8-4fb8-bef1-6c9d7d7e390b": "RnJ5BfJ3"
},#ID和密码
"certificate": "/opt/tuic/fullchain.pem",#(或者你自己选择的公钥位置
"private_key": "/opt/tuic/privkey.pem",#或者你自己选择的私钥位置
"congestion_control": "bbr",#拥塞控制算法可以选择 cubic/bbr/new_reno
"alpn": ["h3", "spdy/3.1"],#ALPN协议可以设置多个,我这里就只设置一个了
"udp_relay_ipv6": true,
"zero_rtt_handshake": false,
"auth_timeout": "3s",
"max_idle_time": "10s",
"max_external_packet_size": 1500,
"gc_interval": "3s",
"gc_lifetime": "15s",
"log_level": "warn"
}
新建systemd配置文件:
nano /lib/systemd/system/tuic.service #其实可以使用winscp工具去编辑文件
黏贴下面的文件:
[Unit]
Description=Delicately-TUICed high-performance proxy built on top of the QUIC protocol
Documentation=https://github.com/EAimTY/tuic
After=network.target

[Service]
User=root
WorkingDirectory=/opt/tuic
ExecStart=/opt/tuic/tuic-server-1.0.0-x86_64-linux-gnu -c config.json
Restart=on-failure
RestartPreventExitStatus=1
RestartSec=5

[Install]
WantedBy=multi-user.target
申请证书:
certbot certonly \
--standalone \
--agree-tos \
--no-eff-email \
--email imlala@example.com \
-d tuic.example.com
将证书保存到tuic配置文件内配置的位置:
cat /etc/letsencrypt/live/tuic.example.com/fullchain.pem > /opt/tuic/fullchain.pem
cat /etc/letsencrypt/live/tuic.example.com/privkey.pem > /opt/tuic/privkey.pem
启动tuic服务并设置开机自启:
systemctl enable --now tuic.service
新建一个certbot的hook脚本文件,用于让tuic重新加载续期后的新证书:
nano /etc/letsencrypt/renewal-hooks/post/tuic.sh
写入如下内容:
#!/bin/bash
cat /etc/letsencrypt/live/tuic.example.com/fullchain.pem > /opt/tuic/fullchain.pem
cat /etc/letsencrypt/live/tuic.example.com/privkey.pem > /opt/tuic/privkey.pem
systemctl restart tuic.service
给脚本执行权限:
chmod +x tuic.sh
测试续期的情况以及脚本能否正常运行:
certbot renew --cert-name tuic.example.com --dry-run
服务端到这里就全部配置完成了,接下来在这个页面下载客户端:https://github.com/EAimTY/tuic/releases,我是软路由open clash,直接填写就运行,其它的直接找。手机安卓我用的
一键安装脚本:(v4 v5)
wget -N https://gitlab.com/rwkgyg/tuic-yg/raw/main/tuic.sh && bash tuic.shtuic-yg一键脚本,相比hysteria更加温柔的udp代理协议,支持变更配置(端口、令牌码Token、证书)
一键脚本:v5
wget -N --no-check-certificate https://gitlab.com/Misaka-blog/tuic-script/-/raw/main/tuic.sh && bash tuic.sh
客户端配置
Windows (V2rayN)
下载v2rayN最新版,目前6.27版本能用
https://github.com/2dust/v2rayN/releases
tuic最新客户端:
- 首先在此:https://github.com/EAimTY/tuic/releases/tag/tuic-client-1.0.0 下载客户端。(Windows 的一般下载
tuic-client-1.0.0-x86_64-pc-windows-msvc.exe),解压至v2rayN的bin/tuic目录中,并重命名为tuic-client.exe - 安卓客户端:
首先将程序升级至1.1.3版本(及以上),然后在此:https://github.com/MatsuriDayo/plugins/releases/tag/tuic-v5-1.0.0-3 下载支持tuic v5协议的插件,并安装


暂无评论内容